Booting a VM from USB in Proxmox
Learn how to pass through a physical USB device to a Proxmox VM and configure it to boot from that USB drive. This is useful for USB-based installers, live environments, or running portable operating systems.
Version Reference: This guide is written for Proxmox VE 8.3/8.4 (based on Debian 12 “Bookworm”). USB passthrough syntax and options may vary in future versions.
Use Cases
Why boot a VM from USB?
- Test USB installers before using on physical hardware
- Run live environments (Tails, Kali Linux, etc.) in a VM
- Install operating systems from USB without creating ISO files
- Use portable operating systems that expect to run from USB
- Develop/test USB-bootable applications in a safe environment
Prerequisites
Before starting, ensure you have:
- A physical USB drive connected to your Proxmox host
- A Proxmox system
- Root/sudo access to Proxmox shell
USB Passthrough
This method passes the entire USB device to the VM, allowing the VM to boot from it directly.
Step 1: VM Creation Setup
Before passing through your USB device, you need to create a VM with the correct settings for USB boot.
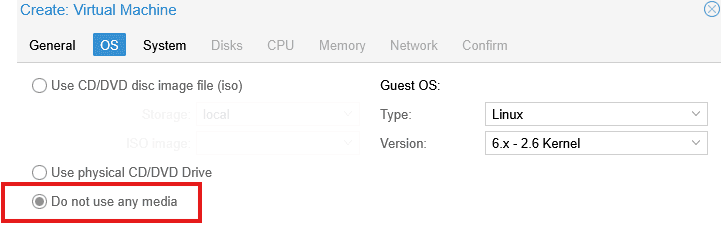
Media Selection
When creating the VM in Proxmox:
- At the OS tab, select Do not use any media
- This is important because you’ll be booting from the USB device, not from an ISO or other media
Machine Type: Q35 vs i440fx
Q35 (Recommended for 2025):
- ✅ Modern chipset with native PCIe support
- ✅ Better USB 3.0 controller support
- ✅ Future-proof (i440fx is deprecated in RHEL 10+)
- ✅ Required for GPU/PCIe passthrough
- ✅ Supports advanced features like vIOMMU
- Best choice for: All new VMs, modern OSes, USB 3.0 devices
i440fx (Legacy):
- ⚠️ Being phased out (deprecated in RHEL 10, old QEMU versions removed)
- ⚠️ Only PCI support (no native PCIe)
- ✅ Better compatibility with very old operating systems
- Best choice for: Legacy systems, existing VMs that can’t be migrated
2025 Recommendation: Use Q35 for all new VMs. It’s the modern standard and provides better hardware support.
System Firmware: UEFI vs SeaBIOS
UEFI/OVMF (Recommended for 2025):
- ✅ Modern standard supported by all current Linux distros (Ubuntu, Fedora, Debian, etc.)
- ✅ Works with modern USB creation tools (YUMI exFAT, Ventoy, etc.)
- ✅ Advanced security features (Secure Boot when needed)
- ✅ Better compatibility with GPT, large disks (>2TB)
- ✅ Required for Windows 11 and modern OS features
- Critical: Disable Pre-Enroll keys to avoid boot issues (see below)
- Best choice for: All modern OSes, current installers, future-proofing
SeaBIOS (Legacy Fallback):
- ✅ Works with very old bootable USB drives
- ✅ Simpler boot process
- ✅ Good fallback if UEFI boot fails
- ⚠️ Legacy BIOS - older technology
- Best choice for: Troubleshooting, very old USB boot media, legacy software
Pre-Enroll Keys (CRITICAL): When using UEFI, you MUST disable Pre-Enroll keys in the System settings. This option enables Secure Boot, which will prevent most bootable USB drives from booting since they aren’t signed with Microsoft keys. Keep it OFF unless you have specific Secure Boot requirements.
2025 Recommendation: Use Q35 + UEFI (OVMF) with Pre-Enroll keys disabled. This is the modern, future-proof configuration that works with all current Linux distros and installation media.
Step 2: Identify Your USB Device (Optional)
First, plug in your USB drive to the Proxmox host and identify it using the Proxmox shell with:
lsusbYou’ll see output like:
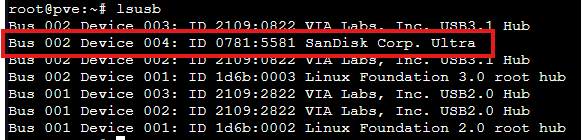
Note the Bus number and Device number (e.g., Bus 002 Device 004).
Also note the Vendor ID and Product ID (e.g., 0781:5581).
Step 3: Add USB Device to VM (Web Interface)
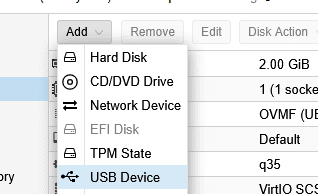
- In the Proxmox web interface, select your VM
- Go to Hardware tab
- Click Add → USB Device
- Choose one of two methods:
Option A: Use Vendor/Device ID (Recommended for Consistent Mapping)
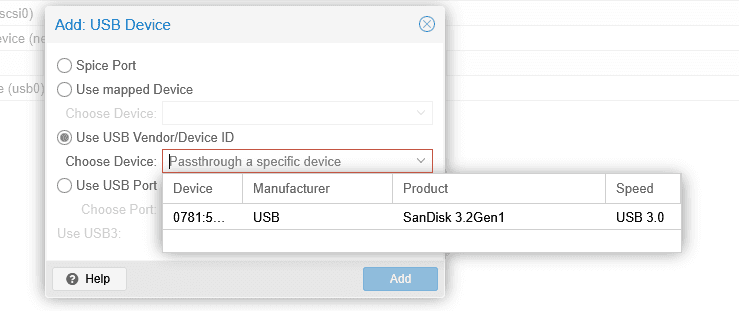
- Select Use USB Vendor/Device ID
- Find the associated USB device
- Click Add
Option B: Use USB Port
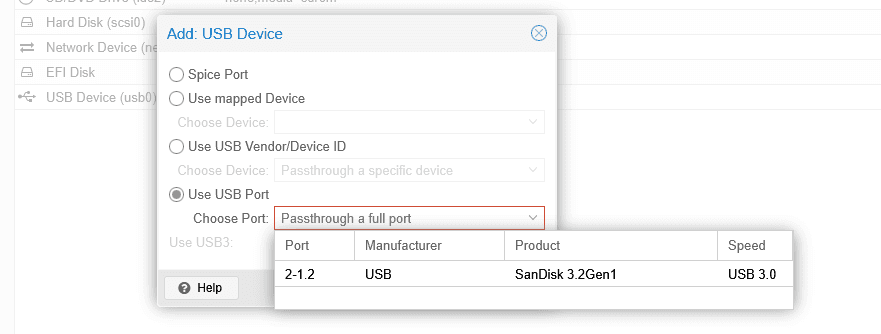
- Select Use USB Port
- Find the associated USB device
- Click Add
Pro Tip: Using Vendor/Device ID is better because the device will work even if you plug it into a different USB port. Using USB Port ties the mapping to a specific physical port.
Step 4: Configure VM Boot Order
Now configure the VM to boot from the USB device:
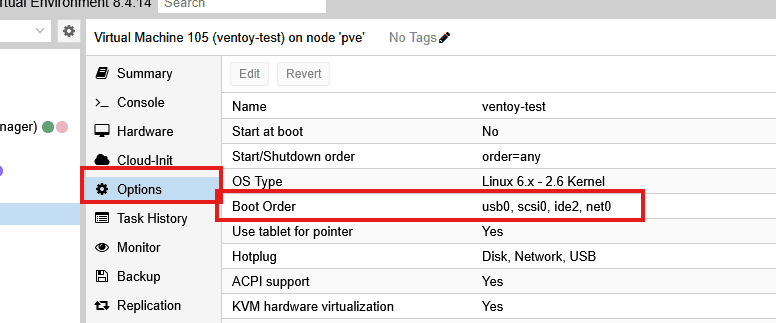
- Select your VM → Options tab
- Double-click Boot Order
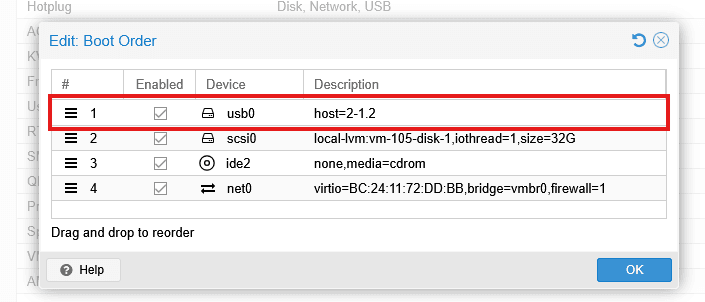
- Enable the USB device (check the box)
- Drag it to the top of the boot order
- Click OK
Step 5: Start the VM
- Click Start on your VM
- Click Console to view the display
- The VM should now boot from the USB drive
Pro Tip: If the VM doesn’t boot from USB, you may need to enter the BIOS/boot menu and manually select the USB device. See troubleshooting section below.
Configuring BIOS/UEFI Boot Settings
Accessing Boot Menu in VM
If the VM doesn’t automatically boot from USB, access the boot menu:
For SeaBIOS VMs:
- Start the VM
- Open Console
- Press ESC or F12 during the Proxmox logo
- Select your USB device from the boot menu
For UEFI/OVMF VMs:
- Start the VM
- Open Console
- Press ESC or F2 during startup
- Navigate to Boot Manager
- Select your USB device
Making USB Boot Permanent
In the BIOS/UEFI menu:
- Navigate to Boot tab
- Set USB device as the first boot device
- Save and exit (usually F10)
Troubleshooting
USB Device Not Showing in VM
Check USB passthrough is enabled:
dmesg | grep -i usbVerify device is recognized by host:
lsusbls -l /dev/bus/usb/*/*Check VM configuration:
cat /etc/pve/qemu-server/100.conf | grep usbEnsure VM has USB controller:
Edit VM → Hardware tab. You should see a USB controller. If not, add one:
qm set 100 -usb0 host=0000:0000VM Boots from Disk Instead of USB
Check boot order:
- VM → Options → Boot Order
- Ensure USB device is enabled and first in the list
Or via command line:
grep boot /etc/pve/qemu-server/100.confShould show USB device first (e.g., boot: order=usb0;scsi0).
Manually select boot device:
- Access BIOS/boot menu during startup (ESC/F12)
- Manually select USB device
UEFI Firmware Won’t Boot from USB
Some USB drives don’t have proper UEFI boot files. Try:
-
Switch VM to SeaBIOS instead of OVMF:
- Shut down VM
- Hardware → BIOS → Change to SeaBIOS
- Start VM
-
Or recreate the USB with UEFI-compatible bootloader
Security Considerations
USB Passthrough Risks
- Malware: USB devices can contain malware. Only pass through trusted USB drives.
- Data leakage: The VM has full access to the USB device, including any data on it.
- Hardware damage: In rare cases, misbehaving VMs could damage USB devices.
Best Practices
- Use snapshots before passing through unknown USB devices
- Test in isolated VMs first
- Don’t pass through system USB devices (keyboard, mouse) unless necessary
- Unmount from host before passing to VM to prevent conflicts
Common Use Cases
Booting Tails OS
Tails requires USB boot for its security features:
- Create Tails USB on physical drive
- Pass through USB to VM using Method 1
- Configure boot order
- Start VM - Tails will boot in isolated environment
Testing Bootable USB Creators
Before writing to physical hardware:
- Create bootable USB normally
- Pass through to VM
- Test if it boots correctly
- If successful, use on real hardware
Running Portable Apps
For USB-based portable operating systems:
- Pass through USB device
- Configure persistent boot
- VM can run the portable OS without installation
Useful Commands Reference
List USB devices:
lsusbList USB tree:
lsusb -tCheck USB device details:
lsusb -v -d 0781:5583List block devices:
lsblkAdd USB to VM:
qm set 100 -usb0 host=0781:5583,usb3=1Remove USB from VM:
qm set 100 --delete usb0Set boot order:
qm set 100 -boot order=usb0;scsi0Monitor USB events:
dmesg -w | grep -i usbCheck VM configuration:
cat /etc/pve/qemu-server/100.confNext Steps
After successfully booting from USB:
- Create snapshots before making changes
- Configure persistent storage if needed
- Set up automated backups for the VM
- Test USB removal/reconnection to ensure stable passthrough
Official Documentation
For more advanced USB passthrough scenarios:
- Proxmox VE USB Passthrough - Official USB device documentation
- Proxmox QEMU/KVM Guide - VM configuration details
- USB Physical Port Mapping - Advanced port mapping
Need to pass through other hardware? Check the Proxmox documentation on PCI passthrough for GPUs, network cards, and other devices!